If you are interested in getting into the Revit API, you're going to need some resources to help you along. Below are the links to the places that have helped me and continue to help me.
First, the free resources:
Autodesk's DevTV introduction to the API:
http://download.autodesk.com/media/adn/DevTV_Introduction_to_Revit_Programming/
Snoop Tool - RvtMgdDbg:
http://download.autodesk.com/media/adn/RevitAPI_2010_Webcast.zip
AUGI Revit API Discussion Forum:
http://forums.augi.com/forumdisplay.php?f=218
Autodesk Discussion Groups - Autodesk Revit API
http://discussion.autodesk.com/forums/forum.jspa?forumID=160
The Building Coder - Jeremy Tammik
http://thebuildingcoder.typepad.com/blog/
CAD Application Development - Matt Mason
http://cadappdev.blogspot.com/
Revit Programming - Ed Pitt
http://revit-programmer.blogspot.com/
Bolt Out of the Red - Guy Robinson
http://redbolts.com/blog/
Rod.Net - Rod Howarth
http://roddotnet.blogspot.com/
And Rod's Revit API search tool:
http://revitapisearch.rodh.org/
Software Development Kit (SDK)
It comes with your Revit media/DVD or if you downloaded Revit and then installed it, look in C:\Autodesk.
The SDK has lots of samples, the Revit API Developer Guide pdf, and the RevitAPI chm (help) file.
These resources aren't free but may be of great value:
Autodesk Developer Network
http://usa.autodesk.com/adsk/servlet/index?siteID=123112&id=723353
Your Autodesk Reseller
And finally some personal notes from my experience with the API
Brief Outline of What I Do When Writting Code:
Working with the Revit API is mostly about automating or simplifying something you can already do manually with regular Revit tools. The exception to this may be in the area of analysis tools. So your first steps with any code you make should be to understand the manual steps, menus, dialog boxes, and human interactions involved in your code idea.
Once you have an idea and understand the regular manual process, then use the snoop tool RvtMgdDbg to learn what is exposed in the API. This will help you figure out if what you want to do is possible. Also look at the SDK examples. That may give you some indication of what is possible as well as give you a head start on your code.
Then as you go, use the resources above to help you along and get over rough spots.
Word of Warning
If your code gets ambitious, be careful about ROI. Revit already automates many tedious tasks and is always improving to automate more. So as a rule of thumb, make sure that the payback for the effort you put into making the code and supporting it occurs before the next release of Revit just in case that new release has a viable equivalent to your code.
This warning is especially directed at those like me who are used to complex coding for AutoCAD. AutoCAD is NOT inherently an AEC program and needs ambitious add-ons to make it so. Revit however IS inherently an AEC program and just needs some simpler (analysis tools excepting) helping code to fit it to your company's workflow. So don't get too carried away before doing some risk assesment.
Comments in Your Code
Do yourself and your company a huge favor and put appropriate comments in your source code. If you get hit by a bus (why are buses always getting the bad rap?) and someone else has to continue with your code or you are revisiting or updating your code which you spent a whole year forgetting about, then these comments will come in handy. Mostly my comments start off by outlining the reason why the code was made and the general outline of what it should do. Then throughout I will put in notes about why a certain coding path was chosen or even why certain seemingly obvious coding paths were not chosen. You can look at the code to see what it is doing, but the why is not always obvious but very important.
2.24.2010
8.25.2009
Fun Curtain Panel Patterns
The new curtain panel pattern based families in Revit are way cool. I have been following and learning from buildz.blogspot.com and have been doing some experimenting of my own. Buildz is a good place to see some examples of what is possible with this new type of element.
So far it seems the best way to work with these new curtain panel pattern based families is to think through what the underlying structure is that you want to achieve, choose the most appropriate base pattern that matches that structure, and then drive your geometry with reference points first, then reference lines, and then planes.
Most of the examples of curtain panel pattern based families I have seen use splines that contort pretty well with whatever crazy mass you put them on. However, each panel and its spline is dimensionally unique. From a maufacturing point of view I was wondering if you could make these curves identical from one to the next so you get the economies of mass production. Here is a sample based on pine cones and fish scales that uses repeated identical discs. The tilt, radius, and position of the discs are adjustable as well as the material. The discs are connected to a triangulated frame.


Below is another panel I made based on a real pre-Revit 2010 project. When we first made this, it was difficult and clunky because it draped across a curved surface and used a lot of voids; but it was a breeze to make with Revit 2010 with crisp seamless edges and no voids.

And here's another with a litte help from the API and instance parameters:

This Spanish tile panel pattern might not perform well for a big roof, but it is possible and looks great (the ridges are a line-based family):
And now for some impractical but fun stuff showing off Revit's curvy abilities. The curl and width of each leaf is adjustable with instance paramet ers so you can get this:
or you can even adjust some visibility parameters to make the 2 additional types from the same family as above seen here:

7.24.2009
Revit 2010 Classic?
ZOMG!
Roll on over to the Augi forums and see what witchcraft and sorcery those 'never-say-die' folks have cast on the new Revit 2010 UI. I'll give you a hint: the ribbon has been cut, shall we say.
Hacks have a way of changing the game. I am curious to see how Autodesk responds. This may get interesting.
More to come...
6.17.2009
Family Matters
It has been hypothesized (by me) that the brunt of the productivity we hit in Revit comes less from the KB reported by Windows and more from the information Revit tries to render on-screen. Re-gen is a beast. Stories are told far and wide about typing 'regen' in the AutoCAD command line and going to grab a cup of coffee, making some phone calls, heading to your daughter's recital, and watching paint dry while your state-of-the-art, AutoCAD desktop crunched the numbers. We make fun of it now and will likewise do so in the future about Revit. But what is it that is making "Revit so slow" NOW?
The Graphix
The debate rages on about the role of the GPU, Open GL, and other current gen compu-speak processes. But right now, what we know is this; the more dense your file (notice I didn't say BIGGER), the more slowly it runs. Density come in a variety of flavors, but the 2 biggest culprits are Data and Model. The "I" and "M", if you will. While data richness is my life's goal and shouldn't be reduced, the Model can (and should) be. One of the the easiest way to control the Model is through the...wait for it...families. Before you think it, this is not a discussion of 2D vs 3D (in my opinion, there is no discussion, but more on that later), but a discussion on View Frugality. That is, showing what is important to you and not showing what's not. While a complex, fully realized 3D family can bulk up your KB, it doesn't have to muck up your view render time. Through a couple of responsible family creation maneuvers, you can have the leanest, meanest, Chuck Norris-est project on the block.
Visibility, Detail Levels, and Symbolic lines...Oh MY!

Long story short...
- ALL forms to be turned off in Plan/RCP (maybe Front/Back. Left/Right, if your elevations are giving you fits too)
- The most highly detailed bits (nuts, bolts, washers...j/k) should be set to Fine ONLY!
- Symbolic Line representation of the family.
What Revit can't see, Revit can't generate. Problem solved.


So stop all this worrying about file size, and focus on better creation. 2D vs 3D is another Red herring. The most highly detailed model and the most generic family of lines are separated by but a few hundred KB. Building Responsible Familes is everyone's responsibility.
5.15.2009
Lazy Parsing
When is the right time to break a single model in multiple models?
That is the $25,000 question, isn't it? Do you rely completely on Windows to tell you the size of our Revit database? If so, what size are you afraid of? How is the database compressed?
Most BIMs start as a singe file. Sometimes, you are asked to split out certain parts of our building for others to access (read: structure, medical equipment, etc). But what about the architect's model? You all know by now that there is a connection between the compressed database size (what Windows reports) and the physical memory we have available. You have perfected the 3G switch and maxed out your MoBo with 4gb of the fastest RAM. You have heard and are applying the 10:1 rule (or [10:1]x2 depending on who you ask). You have all increased your virtual memory to be twice the size of our physical. But, with all that in place, what then is the ceiling? What about compresing the file or even re-creating the central file? Sure, your number will drop significantly, but then balloon back up within days. Can you really trust that number?

The obvious answer (which is not an answer at all) is "maybe". Quite honestly, it's the only number we have to go on. There are, however, other things to be considered. How much detail is Revit trying to render onscreen at a time? Is Revit trying to render and\or hide every face of the every family, or have the 3D forms been hidden in plan, leaving the Symbolic lines to represent? How many families are loaded, but unused. Extraneous views, anyone? Embedded jpgs, or, say it ain't so, exploded ACAD! NOOOOOOOOO!!!!! What about other software running at the same time (FOR SHAME!) "File size" is not the only determinate factor in breaking a BIM apart. It is a bit of a red herring. Only through responsible model building and family creation can better performance be achieved. We must all do our part. Tune in later for a look at "Building Responsible Families", where I will try and dissect the family creation process into it's major functional uses, and assess how far is too far enough.
Otherwise, "split the model up when you need to". Unfortunately, there is no magic number.
4.25.2009
Export to AutoCAD
Are those downstream from you complaining about the Revit pollution in your exported AutoCAD files? Here are the settings that will make them happy.

Use the File name box in conjunction with the Automatic and Long File Naming options to have Revit prefix all your exported drawings with the project name or number. You could add the project name and/or number in the name of the Revit views themselves, but that makes the view names longer and harder to read in the Project Browser.
Make sure the Save as type box is set to the version the AutoCADers like.
Definitely check the Export each view or sheet as a single file if you don't want Revit to make those goofy xrefs in your sheet files.
Now the real important step is to click that Options button and make sure the dialog box looks like this:

"All properties BYLAYER, no overrides" is very important for those getting your AutoCAD files, especially if you have links to other Revit project files. But this setting is not the default. This option makes sure all entities are BYLAYER so those downstream from you can override your colors, lineweights, etc. Many use colors in AutoCAD to control gray-scaling and need all your entity colors to be BYLAYER.
At the bottom, check "Export rooms and areas as polylines". This could be very helpful for those poor people still using outdated technology to count up room square footages across multiple CAD files. This setting is also required for many government projects.
The other setting you want to pay attention to is the Coordinate system basis. For Revit projects that are just 1 file without links to other Revit files, Project Internal may be fine. If your project is multiple Revit files all linked together using Shared Coordinates, you may want to set this to Shared Coordinates, but that's a whole other discussion.
Don't forget to click on the Layer Settings button to choose an appropriate layer export file that matches Revit entities with the correct AutoCAD layers. In the dialog box that pops up you will need to select the Load button and choose our RTKL export file which is:
V:\Revit_Architecture_2008\exportlayers-dwg-RTKL 06a.txt
Here's what those dialog boxes look like:

The bad news is that Revit may not remember your settings the next time you open it up and you will need to double check them every time you export.
10.20.2008
Callouts and Callouts
What is the difference between a 'Detail Callout' and a 'Floor Plan Callout'?
When you start creating a Callout View, you have some options; Detail View and Floor Plan.
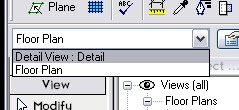
If you create a floor plan callout of a plan view, the callout view displays in the Project Browser under plan views. Alternatively, if you make a detail view of a floor plan, the callout displays as a detail view in the Project Browser.
Other differences include:
.Room Tags cannot be visible in detail callouts.
.Detail callouts can be shown in all floor plans that the callout intersects, whereas floor plan callouts can only be visible in the view they were created in.
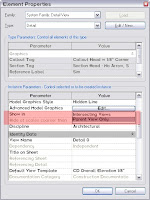
.Detail callouts cannot have a color scheme assigned to it.
Remember, once you choose the type of callout, that's it. There is no toggling between the 2 so choose wisely. Use common sense, if you are creating a construction detail, use a detail callout, if you need just a enlarged floor plan...you got it! You have been warned.
Subscribe to:
Posts (Atom)